How to Remove DRM from Apple Music [3 Easy Methods]
By TOI Staff
November 22, 2023
Update on : November 23, 2023

When Apple Music applied FairPlay DRM to encrypt its streaming music resources, some solutions like removing DRM and converting Apple Music to MP3 can help you play them on other media players or devices. If you are also interested in these solutions, keep reading! That’s what we will discuss in this post.
Why You Need to Remove Apple Music DRM?
DRM is short for Digital Rights Management, which is a modern technique mainly utilized for encoding streaming media content, preventing users from pirating, transferring, or stealing media resources and causing actual loss to the authors. Alternatively speaking, DRM is a way that most streaming resource providers apply to protect the copyright of media content, like music, videos, audiobooks, and so forth.
Once you remove DRM from those DRM-protected files, these audio files can be streamed without any restriction. Other benefits of Apple Music DRM removal include:
To sum up, removing Apple Music DRM will be beneficial to your music streaming journey from the following few aspects:
- Convert Apple Music to MP3 for storing, streaming offline, or making alarms and ringtones in preferences.
- Synchronize Apple Music playlists to play on all devices even without the Apple Music application installed.
- All Apple Music downloads can be kept permanently even after the membership subscription expires.
Remove DRM from Apple Music Songs via A Music Converter
The most efficient way to get rid of DRM is using a professional music converter developed to decrypt this sophisticated technique, one of which is the MuConvert Apple Music Converter.
MuConvert Apple Music Converter provides advanced techniques to decode DRM encryption added on Apple streaming music resources and convert Apple Music to MP3 or other popular formats. The software has been directly embedded with the official Apple Music play to help you remove Apple Music DRM and save the tracks as local files without quality loss.
Sparkling Features of MuConvert Apple Music Converter
- Remove DRM from Apple Music easily and quickly.
- Speed up the song download performance to 10X or even faster.
- Batch convert and download songs from Apple Music to your computer with ease.
- Embed with an Apple Music official music player to guarantee decrypting stability.
- Customized parameter settings to determine music download quality.
- Retain ID3 information for Apple Music downloads for easier managing.
In the following, you can walk through the manipulation guide and master the easiest way to remove Apple Music DRM and convert Apple Music to MP3 in one shot:
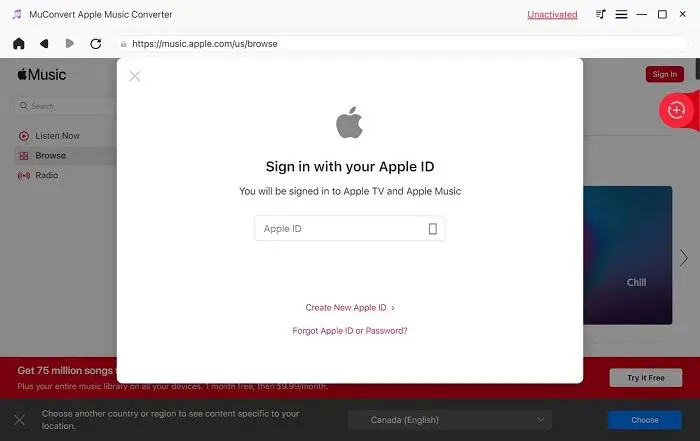
Step 1. Get MuConvert Apple Music Converter installed on the desktop first. When you open the software, enter its embedded Apple Music web player and log in to your Apple Music account.

Step 2. Subsequently, directly search for Apple Music tracks, playlists, or just your library. Simply drag and drop them from the web player to the Add button, then MuConvert Apple Music Converter will add them to the conversion list.

Step 3. To customize music quality before starting to remove DRM from the added Apple Music songs, turn to Menu >> Preferences >> Advanced. In this part, select both the format and quality to convert Apple Music to MP3 in no time.

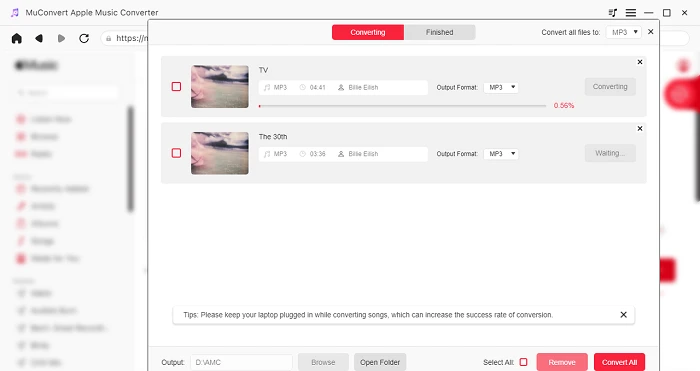
Step 4. Finally, click on the Convert All button, and the music converter will start downloading the Apple Music playlist for you. It also removes DRM at the same time.

When the downloads are all completed, move to the Finished module and click on the View Output File. The pop-up output folder stores all DRM-free Apple Music downloads.
Remove Apple Music DRM by Subscribing via iTunes Match
The official iTunes Match subscribing service offers a way to help you get DRM-free Apple Music tracks. However, it only works for those Apple Music songs purchased on iTunes before 2009, because the later music resources have been DRM-free already.
Do note that iTunes Match requires a monthly subscription fee. If you have subscribed to this service, you can then follow the procedures below to remove DRM from Apple Music purchased before 2009 effortlessly:
Step 1. In iTunes, log in using your Apple ID and activate the iTunes Match function first (by purchasing the service you can immediately access its DRM-free Apple Music songs downloaded ability).

Step 2. After login, iTunes Match will automatically scan through your music library to match your saved music playlist with its music resources database.
Step 3. There will be an iCloud Download button appearing behind each Apple Music track. Directly tap this button and you can download the song in DRM-free condition to save it locally on your device.

Remove DRM Protections from Apple Music via Audio Recorder
Recording Apple Music with an audio recorder is also a way to remove DRM from Apple Music tracks and save them as regular audio clips to play offline later on. Recording can be more flexible, like you don’t have to capture a complete song but only some parts of it.
FonePaw Screen Recorder has delivered multiple recording modes, with the audio-only one oriented for capturing system sound. To deliver good audio effects, it is equipped with noise cancellation and audio enhancement features to ensure good quality for audio recordings, making it a perfect option to record Apple Music and save them as DRM-free files.
Nevertheless, the downside of recording Apple Music to bypass DRM is that it is pretty time-consuming. Because you have to manually record the songs repeatedly and wait for the record to finish. In addition, the music quality is not guaranteed, cause sometimes noise will still be captured to affect the original sound effects.
Nevertheless, if you only remove DRM from several Apple Music songs, FonePaw Screen Recorder is a good option. The following procedures simply lead you through how to process the program:
Step 1. Run FonePaw Screen Recorder.
Step 2. Before starting recording Apple Music songs, you should test the sound volume to set it at a perfect level. Remember to toggle off the microphone recording function to avoid capturing any external noise.

Step 3. Click the gear button above the microphone box, and open Preferences to further select noise cancellation or audio enhancement functions on (registered users only).

Step 4. When settings are all completed, prepare the Apple Music track and also return back to the interface of the Audio Recorder and tap REC. Now you only need to wait for the recording to complete.

Step 5. Once the song ends, also tap the Stop button to stop the recording. Tap Save to export the recording and save it as a DRM-free regular audio file to play wherever you want!
Final Words
DRM can probably be a reliable technique for organizations and companies to apply on media to protect copyright, but it also leads to great inconvenience. If you also run into trouble playing Apple Music because of restrictions brought by DRM, the 3 methods in the post can be helpful to get rid of it. For fast and easy DRM removal, go for MuConvert Apple Music Converter. It will impress you.
Read more: How to Remove DRM from Apple Music [3 Easy Methods]


